To reduce microphone background noise on Windows, fix the noise source first, improve microphone placement second, and add one software filter only when noise still reaches the input. This order keeps speech clearer and makes it easier to tell which change worked.
Start by recording ten seconds in Sound Recorder (called Voice Recorder on some Windows versions) with the same microphone, distance, input level, and background noise you normally use. Listen on headphones. The sound you hear determines the first fix: echo, steady room noise, keyboard impacts, nearby speech, electrical noise, and clipping all need different treatment.
| What you hear | Start here | If it remains |
|---|---|---|
| Echo or feedback | Use headphones and move speakers away from the microphone. | Keep the calling app’s echo cancellation enabled. |
| Fan, HVAC, or road noise | Move or redirect the source; move the microphone closer and lower its gain. | Try Windows, app, or virtual-microphone suppression. |
| Keyboard and mouse | Move the microphone off the desk and place its least-sensitive side toward the keyboard. | Use app or virtual-microphone suppression for remaining clicks. |
| Nearby voices | Close the door or use a close-positioned directional headset microphone. | Try voice isolation or a speech-aware noise filter. |
| Hiss, hum, or crackle | Check the cable, USB port, input gain, and microphone on another device. | Fix the hardware or electrical cause before adding suppression. |
| Clipped or distorted speech | Lower the input gain and increase the distance from your mouth slightly. | Turn off stacked filters and retest one layer at a time. |
Reduce noise before it reaches the microphone
Software has less work to do when the room and desk are quieter. Close doors and windows, move away from kitchens and shared spaces, redirect fans and air vents, and silence devices that produce alerts. Soft furnishings can reduce reflections in a bare room, but they will not soundproof it.
Use headphones to prevent echo
Headphones stop the microphone from hearing the people and media coming through your speakers. This is the most reliable fix for speaker-to-microphone echo and feedback. It does not remove keyboard, fan, or nearby speech from the microphone, so treat those separately.

Isolate desk vibration
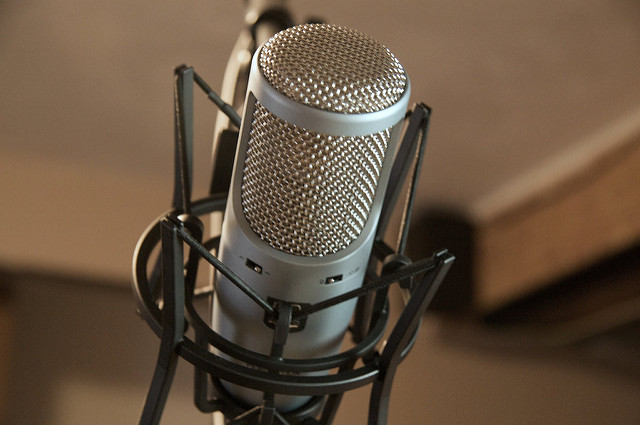
Typing, mouse movement, and knocks travel through a desk into a desktop microphone. Put the microphone on a stable surface, move it onto a boom arm, or use a compatible shock mount. Lowering input gain after moving the microphone closer to your mouth also reduces the relative level of desk noise.
Set up the microphone for your voice
A strong, clean voice signal is easier to preserve than a distant voice mixed with room noise. Move the microphone closer, speak across rather than directly into it when plosives are a problem, and lower the input gain until normal speech is clear without clipping.
Use the pickup pattern
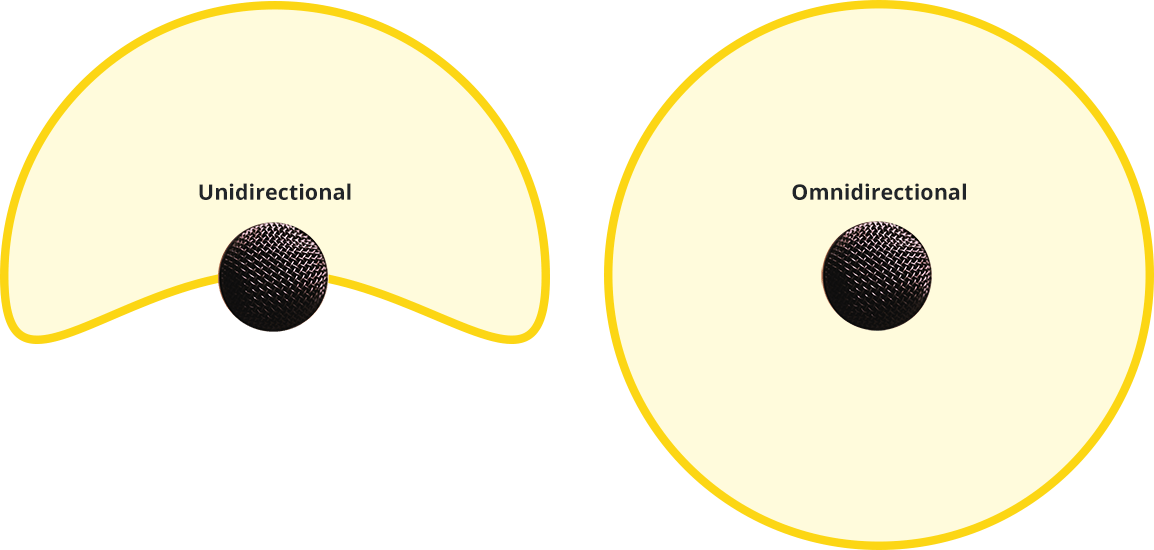
A cardioid or other directional microphone is most sensitive at the front and rejects more sound from other directions. Face its active side toward your mouth and place the keyboard, fan, or other noise source toward its least-sensitive side. Check the manufacturer’s diagram because the active side is not always the end of the microphone.

Position a headset boom beside your mouth
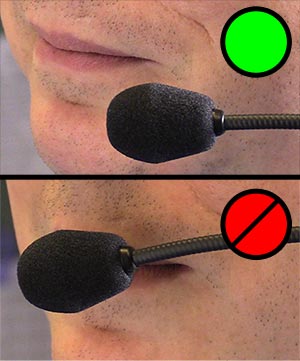
A headset microphone stays close to your voice and moves with your head. Place the boom just beyond the corner of your mouth—not in front of your lips or nose—to reduce breathing and plosive noise. Avoid turning the input gain up after positioning it correctly.
Check Windows microphone settings
In Windows 11, open Settings → System → Sound, select the microphone under Input, and confirm that Windows is listening to the intended device. Set the input level while speaking at your normal distance. In Windows 10, use the corresponding Sound input settings.
Some audio drivers expose enhancements such as noise suppression or acoustic echo cancellation; others do not. The labels and controls belong to the microphone or sound-device driver, so do not assume every PC has the same “Enhancements” tab. If an enhancement damages speech, turn it off and compare again.
Use Voice Focus when the PC supports it
Microsoft’s Windows Studio Effects includes Voice Focus, which filters background noise from a supported built-in microphone at the system level. It requires a compatible Windows 11 device with NPU hardware, an opted-in manufacturer, and the correct driver. External USB microphones may not expose the effect. If the control is absent for your microphone, that device may not support it.
Check the calling or recording app
Application noise suppression only affects calls or recordings made through that application. It is a good first choice when one app is the only place you have a problem. Keep music and other non-speech audio in mind: aggressive speech filters may remove instruments or other sounds you intended to share.
Microsoft Teams
Teams includes built-in noise suppression . Microsoft also offers voice isolation , which uses a voice profile to retain your voice and reduce surrounding voices. Availability can depend on platform and organization settings.
Discord, Zoom, games, and recording apps
Look for the application’s current input-device, echo-cancellation, and noise-suppression settings. Discord users can follow our keyboard-noise guide . If you need push-to-talk in an app that does not provide it, see the Windows push-to-talk guide .
Use a virtual microphone across Windows apps
A virtual microphone is useful when you want one processing layer before several applications. Select your physical microphone in the filtering app, then select the app’s virtual microphone as the input in Teams, Zoom, Discord, Slack, OBS, or another program.
Noise Blocker processes your outgoing microphone locally on Windows and makes the cleaned signal available to apps through a virtual microphone. It is designed for automatic real-time filtering rather than recording individual noise samples or tuning thresholds.
- Download Noise Blocker and choose your physical microphone.
- Turn filtering on and speak at your normal distance.
- In the calling or recording app, select the Noise Blocker virtual microphone as the input.
- Record a test, then compare app suppression on and off rather than assuming both filters are better.
For differences in features, processing, and long-term price, see our documented Krisp and Noise Blocker comparison .
Test the result, not just the noise meter
Use the same microphone, position, input level, sentence, and background sound for each recording. Listen for removed noise and for damaged consonants, pumping, dropouts, metallic tone, or delay. A quieter recording is not better if customers or teammates struggle to understand the voice.
- Save an unprocessed baseline.
- Test room and microphone changes before software.
- Test Windows, app, and virtual-microphone filtering separately.
- Repeat the test after reconnecting the microphone and restarting the app.
- Ask another listener to rate speech clarity without knowing which version is which.
Teams working in a shared office should also review our call-center noise guide , because room layout, speech privacy, and nearby agents require more than an individual microphone setting.